The Core Purpose of Hand Wraps in Combat Training
Wrapping your hands before slipping on gloves is the single most important safety routine in striking sports. A standard boxing glove protects your sparring partner and absorbs surface impact, but it does not prevent the twenty-seven delicate bones in your hand from shifting under load. When a punch connects with a heavy bag or a focus mitt, immense kinetic energy travels backward through your knuckles, fingers, and wrist. Without proper structural support, that force can cause fractures, sprained joints, or chronic soft-tissue inflammation.
A well-applied wrap binds the loose framework of the hand into a single, cohesive unit. Instead of allowing individual metacarpal bones to splay or bend independently upon impact, the fabric creates a rigid shield that distributes pressure evenly across the knuckle bed and channels force down through the forearm. This stability prevents the wrist from buckling on off-center strikes, which is one of the most common acute injuries among beginners and experienced competitors alike.
Whether you are stepping into a ring or training across various disciplines at MMA gyms, the logic remains identical. You are not simply adding soft cushioning beneath a leather glove; you are strapping your hand into an internal cast that maintains joint alignment. Taking five minutes to bandage your hand correctly preserves your joints so you can train consistently over years rather than spending weeks recovering from preventable hand trauma.
Choosing the Right Wrap Length and Material
Hand wraps come in several styles, but the standard 180-inch semi-elastic wrap, often referred to as a Mexican-style wrap, is the preferred choice for most adult boxers. The slight synthetic blend gives the fabric a gentle stretch, allowing it to conform snugly to the contours of your hand without cutting off blood flow when you close your fist. Shorter 120-inch wraps exist, but they are typically intended for children or athletes with small hands who cannot fit excess bulk inside smaller gloves.
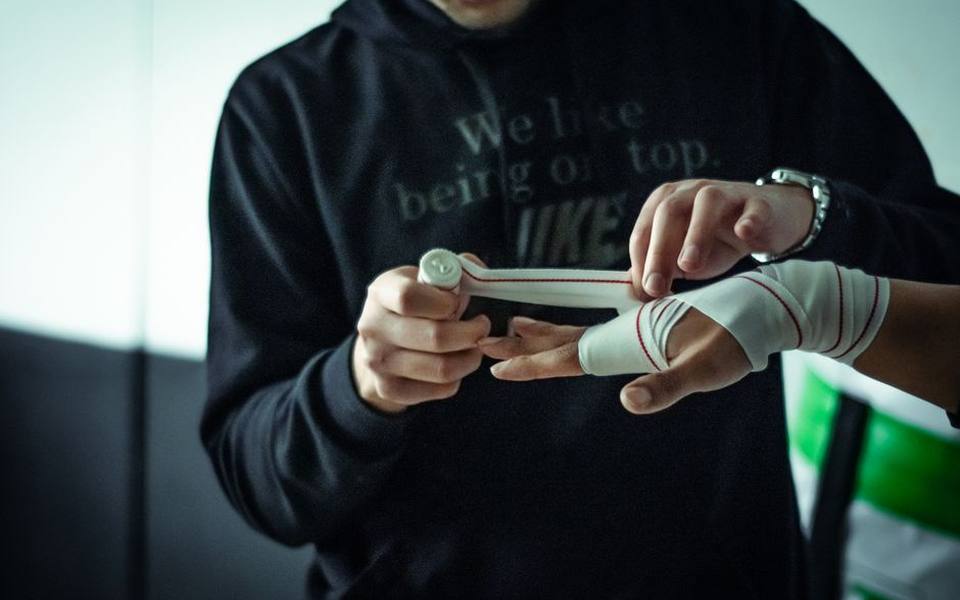
Traditional non-stretch cotton wraps are also widely available. While durable and simple to wash, pure cotton lacks elasticity, making it harder to achieve consistent tension across the knuckles and wrist. If a cotton wrap is pulled slightly too tight, it restricts circulation; if left slightly loose, it bunches up inside the glove during sustained heavy bag work. Elastic cotton blends provide far greater forgiveness as your hand expands and contracts during high-intensity rounds.
Competitive boxers use professional gauze and athletic tape applied by a corner coach before sanctioned bouts, but reusable fabric wraps are the standard for daily gym practice. Avoid gel-padded quick wraps if your goal is long-term hand conditioning. While slide-on slip wraps save a few minutes in the locker room, they offer minimal structural wrist stability and leave the thumb vulnerable to hyperextension during angled hooks.
Setting Up Your Hand and Starting the Anchor
Before you unroll a single turn of fabric, inspect the wrap to ensure it is rolled with the velcro facing inward and the thumb loop exposed. Lay your hand flat on a bench or hold it upright with your fingers spread comfortably wide. Spreading your fingers during the entire wrapping process is critical because your hand naturally broadens when making a fist. If you bandage a relaxed or clenched hand, the wrap will feel uncomfortably tight the moment you close your fingers inside the glove.
Place the fabric loop around the base of your thumb, ensuring the printed side of the material faces down against your skin so the closure aligns properly at the finish. Pull the fabric across the back of your hand rather than over the palm. Crossing the back of the hand first prevents the loop from tugging uncomfortably against the thumb webbing when you tighten down the subsequent layers.
From the back of the hand, direct the wrap immediately down around your wrist. Make three complete, flat passes around the joint, keeping the fabric smooth without twists. Position the wrap so it spans both the lower wrist joint and the base of your palm, creating a firm bridge between the arm and the hand. This foundation anchors the entire wrap and establishes the tension baseline for the remaining steps.
Building the Knuckle Protection Pad
Once your wrist anchor is established, bring the wrap diagonally across the back of your hand, moving from the thumb side of the wrist upward toward the outside base of your pinky knuckle. Continue winding the wrap across the tops of your knuckles, moving from the little finger across to the index finger. Keep your fingers held wide so the padding maintains enough slack to compress naturally when you form a striking surface.
Make three to four clean revolutions around the knuckle line. Each turn should overlap the previous layer by roughly half the width of the wrap to create a uniform pad across the primary impact zone. Be careful not to slide too far down the fingers toward the middle joints; the cushioning must sit squarely over the prominent striking knuckles that meet the target on straight punches.
After finishing the knuckle passes, carry the remaining fabric diagonally back down across the back of your hand toward the opposite side of your wrist. Wrap around the wrist once to lock the knuckle pad in place. At this stage, your hand should feel supported across the top, but you should still be able to open and close your hand without feeling sudden constriction across the palm.
Threading the Fingers for Lateral Stability
The next stage secures the knuckle pad so it cannot slide backward or bunch up when your glove rubs against it. Bring the wrap from behind the wrist, across the back of your hand, and thread it up between your pinky and ring finger. Pull the fabric through toward your palm, keeping it flat against the skin to avoid thick, uncomfortable ridges between the finger bases.
Once the wrap clears the finger gap, bring it across your palm, around the side of your index finger, and diagonally back down over the back of the hand to the wrist. Complete one turn around the wrist to anchor that finger pass. Next, repeat the exact process between your ring and middle fingers, again anchoring at the wrist before threading between your middle and index fingers.
Threading between each digit separates the metacarpal bones slightly and prevents them from grinding together under heavy impact. It also locks the padded knuckle layers firmly against the front of the hand. While instructors in traditional styles or boxing coaches may have slight preferences on the order of the fingers, the core rule remains: every pass between digits must be secured around the wrist before moving to the next.
Locking the Thumb to Prevent Joint Hyperextension
The thumb is the most commonly sprained joint in combat sports because an errant hook or grazing punch can easily catch the tip and pry it away from the palm. After completing your finger passes and anchoring at the wrist, guide the wrap up along the outer edge of your hand and loop it around the thumb, starting from the back and circling toward the front.
Pull the wrap smoothly across the front of the thumb joint, continuing around to wrap the thumb in a single firm loop. Do not pull with excessive tension here, as the base of the thumb contains sensitive nerve pathways and arteries that can throb if constricted. The goal is simply to tether the thumb closer to the hand rather than allowing it to hang loosely outward.
From the thumb loop, guide the fabric straight across the back of your hand toward the base of the wrist. Complete a full circle around the wrist, creating an X-pattern over the back of the hand. This figure-eight design mechanically reinforces the thumb base, preventing it from hyperextending backward when you drive power through your lead hand during training drills.
Finishing the Wrap and Checking Tension
With the knuckles, fingers, and thumb locked, you will typically have two to three feet of wrap remaining. Use this remaining length to reinforce whichever area feels like it needs extra support. If you have previously sprained a wrist, direct the remaining turns around the wrist joint to build extra stiffness. If you are hitting hard leather bags, place one or two final turns over the knuckle pad.
End the wrap around the wrist so the hook-and-loop velcro tab seals smoothly against the fabric. The fastener should sit flat against the back or outer side of your wrist rather than the inside, where it might scrape against the cuff of your glove. Press the velcro firmly to ensure it will not separate during intense sweat-heavy rounds.
Test your wrap immediately before putting on your gloves. With your hand relaxed, the fabric should feel snug and secure, like a fitted sleeve, without pulsing or pinching. Squeeze your hand into a tight fist. As your fist closes, the wrap should pull taut across the knuckles and lock your wrist rigidly in line with your forearm. If your fingers turn pale or tingle, unroll the wrap and start again with lighter tension.
Adapting Techniques for Mixed Martial Arts and Bag Work
Striking in four-ounce gloves during mixed martial arts programs presents a distinct challenge because compact gloves have far less internal cavity space than large boxing mitts. Using a bulky 180-inch wrap inside an open-finger grappling glove can make it impossible to close your fingers properly, which paradoxically increases your risk of breaking hand bones upon impact.
When strapping hands for mixed disciplines, athletes typically use shorter wraps or focus more layers on the wrist and back of the hand while keeping the knuckle pad relatively slim. This allows the fingers to maintain the dexterity needed for clinching and grappling transitions without sacrificing basic wrist rigidity during striking combinations.
Conversely, if your training session is strictly dedicated to heavy bag power work, knuckle protection takes precedence. The stationary mass of a heavy bag exerts far greater blunt force on the joints than hitting focus pads. Taking extra care to form a clean, thick knuckle barrier protects your skin from friction blisters and shields your joints from repeated low-velocity concussions.
Common Mistakes That Threaten Hand Health
One of the most frequent errors made by beginners is wrapping too tightly at the beginning of the process. Pulling the fabric with maximum tension while the hand is relaxed cuts off circulation within ten minutes of warmups, causing hand cramping and numbness. A wrap should feel supportive, not restrictive, with the tension tightening only when you actively clench your fist.
Another dangerous mistake is failing to cross the wrist frequently enough. Some athletes concentrate almost all their wrap length into a giant pad over their knuckles, leaving only one thin turn around the joint below. While their knuckles feel soft, their wrist remains limp and vulnerable to bending sharply if an off-target punch clips the bag at an awkward angle.
Allowing the wrap to twist into ropes or thick folds between your fingers is equally problematic. These twists create pressure points that dig into the skin under impact, causing painful bruising or split webbing. Keep the fabric completely flat on every pass. If a twist occurs, unroll that section and flatten it out before proceeding.
Caring for Hand Wraps Between Gym Sessions
Hand wraps absorb significant amounts of sweat and dead skin cells during every training session. Leaving damp wraps crumpled at the bottom of a gym bag creates an ideal environment for bacteria, mildew, and unpleasant odors that quickly transfer into the linings of your expensive boxing gloves. Proper wrap hygiene is essential for both gear longevity and skin health.
Wash your wraps after every one or two training sessions. To prevent them from tangling into an unusable knot in the washing machine, seal them inside a mesh laundry bag and close the velcro tabs securely before washing. Wash on a gentle cycle with mild detergent in cold or warm water, and avoid using high heat, which breaks down the elastic fibers over time.
Hang your wraps over a drying rack or door frame to air dry rather than running them through a commercial dryer. Once the fabric is completely dry, roll the wraps smoothly with the velcro on the inside so they are primed and ready for your next session. Rolling them cleanly takes less than a minute and ensures your preparation in the gym is fast and frustration-free.
Finding Qualified Coaching for Proper Fundamentals
While written guides and instructional diagrams provide a reliable framework, having an experienced striking coach examine your hands in person is the most effective way to dial in your technique. A seasoned trainer can spot subtle flaws in your tension, adjust the wrap to fit your unique hand proportions, and show you how your hand structure aligns when throwing specific punches.
If you are looking to start boxing or expand your striking skills, finding a reputable gym with hands-on coaching is an invaluable investment. Experienced coaches at Martial Arts Schools in California and across thousands of community training spaces nationwide prioritize student safety from day one, beginning with foundational gear preparation before students ever throw a punch against resistance.
Learning the proper discipline of wrapping your hands instills the professional mindset required for combat sports. Treating your hand protection with seriousness demonstrates respect for your body and your craft, setting the stage for safe, progressive, and injury-free athletic development over many years of training across all states.
Published 2026-09-20 · reviewed with each rebuild, last September 2026.
Find martial arts schools near you
The directory lists 32,877 martial arts schools by state and city — pick your state or use the “Near me” button in the header.
More guides
-
 Owning
Establishing a Proper Heavy Bag Routine and Striking Technique at Home
-
 Safety
Brazilian Jiu-Jitsu for Beginners: Tips, Fundamentals, and Mat Health
-
 Buying
Finding the Right Fit: A Guide to Sizing Your Jiu-Jitsu Uniform and Cross-Training Gear
-
 Money
MoneyHow Much Do Martial Arts Classes Cost? Membership Fees Breakdown
-
 Owning
What Is Mixed Martial Arts? Beginner Overview and Training Guide
-
 Owning
The History, Origins, and Physical Demands of Brazilian Jiu-Jitsu
-
 Owning
Traditional Martial Arts Guide: Understanding Wushu, Silat, and Naginata
-
 Owning
Understanding Mixed Martial Arts for Beginners
-
 Buying
Best Jiu-Jitsu Gis and Apparel: Complete Buyer's Guide and Sizing Chart
-
 Buying
BJJ vs Judo vs Wrestling vs No-Gi: Which Grappling Art Is Right for You?
-
 Buying
How to Choose the Best Jiu-Jitsu and MMA Gym Near You
-
 Owning
Brazilian Jiu-Jitsu for Beginners: Rules, Belt Ranks, and Mat Training
-
 Buying
Kickboxing Classes & Cardio Fitness Workouts Guide
-
 Owning
Martial Arts Belt Ranking Systems: Progression, Orders, and Displays
-
 Buying
Jeet Kune Do: History, Philosophy, and Modern Training Guide
-
 Buying
BJJ Gis and Uniforms Buyer's Guide: Brands, Fit, and Care
-
 Buying
Gracie Jiu-Jitsu Lineages, Academy Networks, and Training Philosophies
-
 Buying
10th Planet Jiu-Jitsu: Complete Guide to the No-Gi System and Academies
-
 Safety
Tai Chi Classes for Seniors: Health Benefits, Styles, and Practice Guide
-
 Owning
Heavy Bag and Boxing Workouts: Home Setup, Gear Selection, and Training Guide
-
 Buying
Adult Karate and Taekwondo Classes: Getting Started and Gi Sizing
-
 Owning
IBJJF Tournaments and Competition Guide: Databases, Rules, and Events
-
 Safety
Custom vs. Boil-and-Bite Mouthguards: Complete Selection and Fitting Guide
-
 Safety
Women's and Adult Self-Defense Training Guide: Techniques, Classes, and Systems
-
 Owning
Traditional Chinese Martial Arts: Shaolin, Wing Chun, Jeet Kune Do, and Gear Guide
-
 Buying
Adult Martial Arts Guide: Choosing the Right Style, Gym, and Training Class
-
 Buying
Filipino Martial Arts, Kenpo, Aikido, and HEMA: Comparing Traditional Combat Styles
-
 Owning
Heavy Bag Workout Guide: Routines, Drills, and Training for Cardio and Weight Loss
-
 Buying
Muay Thai and Cardio Kickboxing Classes: Training, Techniques, and Fitness Programs
-
 Buying
BJJ Gis, Rash Guards, and Apparel: How to Choose, Size, and Care for Jiu-Jitsu Gear
-
 Safety
Women's and Adult Self-Defense Classes: Selecting Programs for Real-World Safety
-
 Owning
Martial Arts Belts and Ranks: Belt Order, Taping, and Display Racks Guide
-
 Safety
Martial Arts Conditioning, High-Kick Mobility, and Protective Gear Guide
-
 Buying
Kids and Toddler Martial Arts: Complete Guide to Classes, Camps, and Family Dojos
-
 Owning
How to Hang a Heavy Bag: Ceiling and Wall Mounting Installation Guide
-
 Buying
Brazilian Jiu-Jitsu Schools, Academies, and Lineages: A Complete Guide
-
 Buying
Martial Arts Gyms, Fitness Studios, and Dojos Directory Guide
-
 Buying
Traditional Martial Arts Styles and Specialized Disciplines Guide
-
 Owning
BJJ and Martial Arts Gi Selection, Sizing, and Equipment Care Guide