Setting Up Your Space and Starting Heavy Bag Training at Home
Starting a heavy bag routine at home requires more than just hanging a cylinder of packed fabric from a basement joist. Before throwing a single punch, you must ensure your training perimeter provides at least five to six feet of unobstructed clearance in every direction. A bag that swings into drywall, support posts, or storage shelving quickly becomes a safety hazard and restricts your footwork. Clear the floor entirely of tripping hazards, secure any loose cables, and establish a dedicated training zone that permits complete rotational movement around the target.
Choosing the right bag weight depends heavily on your body size and experience level. A standard guideline suggests selecting a bag roughly half your body weight, which typically ranges from seventy to one hundred pounds for adult practitioners. A bag that is too light will swing wildly from minimal contact, ruining your rhythm, while an overly dense or rigid bag transfers excessive shock into your wrists, elbows, and shoulders. Take time to inspect the hanging hardware, ensuring heavy-duty swivel hooks and load-rated chains absorb vibration without loosening overhead mounts.
Footwear and floor surfacing represent another critical variable during early sessions. Striking a bag while wearing standard running shoes with elevated heels can torque your knees and roll your ankles during pivoting motions. Flat-soled cross-trainers, dedicated boxing boots, or high-density interlocking foam mats for barefoot work provide the necessary traction while allowing natural pivot mechanics. If you train on bare concrete, consider laying down dense rubber stall mats to cushion the repetitive impact transmitted through your lower joints.
The primary mindset for any beginner working alone at home must prioritize technical precision over raw kinetic power. Striking the bag at full force with compromised mechanics builds muscle memory around bad habits and invites sudden soft-tissue injuries. Approach your first several weeks as skill acquisition sessions where cadence, defensive posture, balance, and clean bone alignment matter far more than how loudly the bag pops upon impact.
Protecting Your Hands and Mastering the Boxing Wrap
Throwing bare knuckles into a heavy bag is one of the fastest paths to broken metacarpals, sprained wrists, and chronic joint inflammation. Standard hand wraps serve as an internal cast, pulling the small, fragile bones of the hand into a single compact unit while bracing the wrist against hyperextension. Standard cotton wraps measuring one hundred and eighty inches offer the optimal balance of wrist stabilization and knuckle coverage for almost all adult hand sizes.
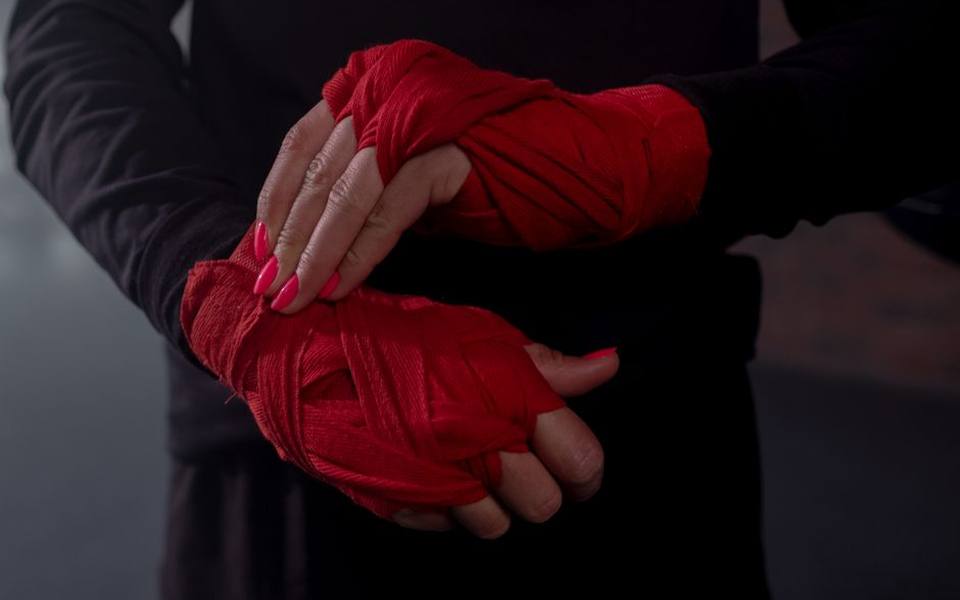
To wrap properly, place your thumb through the starter loop, ensuring the flat side of the fabric rests flush against your skin. Anchor the wrap by making three firm passes around the wrist joint, maintaining steady tension without cutting off circulation. From the wrist, bring the fabric diagonally across the back of the hand to the base of the pinky knuckle, wrapping across the knuckles three to four times to create a protective cushion over the primary striking surface.
Lock the structure by weaving the wrap between each finger, starting between the pinky and ring finger, wrapping around the wrist after each pass to secure the line of tension. Once all finger separations are established, make an additional wrap around the thumb to anchor it securely against the fist, preventing it from catching or bending backward during an errant punch. Finish the sequence by applying the remaining fabric in overlapping layers around the wrist, securing the hook-and-loop closure firmly.
Make a fist to test the tension immediately after wrapping. The wrap should feel snug and supportive when your fist is closed, yet comfortably relaxed across the palm when your hand opens naturally. Slide your wrapped hand into dedicated bag gloves, typically between fourteen and sixteen ounces for beginners, which provide multi-layered foam padding that absorbs impact shock far better than minimalist competition mitts.
Fundamental Punch Mechanics and Joint Alignment
A fundamentally sound punch originates from the floor, passes through hip rotation, and terminates along the arm into the first two knuckles of the hand. Beginners often make the mistake of pushing the bag rather than snapping their strikes, which smothers power and leaves the shoulder vulnerable to impingement. Stand with your feet shoulder-width apart, dominant foot stepped back at a slight angle, knees soft, and elbows tucked tightly against your ribcage.
The lead jab establishes distance and breaks the bag's swinging rhythm. Extend your lead arm straight forward while rotating the forearm inward so your palm faces downward upon impact, driving through the index and middle knuckles. Simultaneously, push off the back foot to transfer weight forward, snapping the fist back to your cheek instantly along the exact same path. Keeping the non-punching hand glued to your temple protects your head from theoretical counters.
The straight cross delivers maximum power through complete kinetic linkage. Pivot your rear foot on its ball as if squashing an insect, turning your rear hip and shoulder directly toward the center line of the bag. As the cross connects, align your wrist in a perfectly neutral line with your forearm bones; bending the wrist upward or downward upon impact causes severe sprains. Those seeking structured guidance on foundational stances often look into traditional martial arts schools to build discipline and balance.
Hooks and uppercuts require shorter ranges and controlled rotational arcs. For a lead hook, pivot on your lead foot, locking your elbow at a ninety-degree angle and turning your torso as a solid unit rather than swinging with arm strength alone. Uppercuts drive upward through leg extension and hip thrust, targeting close-range vulnerabilities. Throughout all striking combinations, exhale sharply through your nose or teeth on contact to brace your core against fatigue.
Delivering Kicks Safely on a Heavy Bag
Kicking a dense heavy bag without proper conditioning can severely damage the delicate metatarsal bones of the foot. Unlike kicks shown in entertainment media, full-contact roundhouse strikes rely on the lower third of the shin bone as the primary impact point. The tibia is a dense, weight-bearing bone capable of withstanding immense pressure once conditioned, whereas striking a heavy bag with the toes or foot arch frequently leads to sprains and hairline fractures.
Executing a clean roundhouse kick starts with an angled step outward with your lead foot, positioning your base slightly off the centerline of the bag. Pivot on the ball of that support foot between ninety and one hundred and thirty degrees, opening your hips entirely. As your base leg rotates, swing your striking leg across in a horizontal trajectory, turning your hip over so that your knee and shin point straight through the target rather than glancing upward.
The teep, or front push kick, functions as the striking equivalent of a jab with your lower body. Lift your knee straight toward your chest to chamber the kick, then thrust your hips forward while extending your leg, making contact with the ball of the foot rather than the heel or flat sole. Use the teep to interrupt a swinging bag or create physical space, retracting the foot along the chamber path to prevent the leg from dropping lazily to the floor.
Beginners should restrict kicking height to low and mid-level targets, focusing on thigh and rib heights rather than aiming for head-level kicks. High kicks require significant hamstring flexibility and pelvic stability; forcing them too early causes lower back strain and unstable balance. Many enthusiasts transition to structured kickboxing classes for beginners to refine these lower-body trajectories under the watchful eye of an experienced striking coach.
Structuring Beginner Heavy Bag Rounds and Conditioning
A productive home punching bag workout mimics the interval structure of combat sports, relying on timed rounds followed by brief recovery periods. For beginners, a routine consisting of four to six rounds, each lasting two to three minutes with sixty seconds of rest between them, provides a balanced cardiovascular and muscular stimulus. Working within set timeframes prevents aimless flailing and forces you to manage energy distribution across the entire session.
Dedicate your first round entirely to the lead hand and defensive positioning. Circle the bag continuously, changing directions frequently, and throw single jabs, double jabs, and footwork feints to establish range without loading up on power. In round two, integrate the rear cross, practicing standard one-two combinations while focusing on snapping the hands back to your guard. Maintain a rhythmic bounce in your stance rather than planting your feet flat on the floor.
Rounds three and four introduce level changes, hooks, and push kicks to elevate cardiac demand. Practice firing a jab, stepping at an angle to throw a lead hook, and finishing with a rear push kick as the bag swings back toward you. In the final rounds, incorporate short fifteen-second output bursts where you throw straight punches at fifty percent power with maximum hand speed, immediately returning to disciplined defensive movement until the bell sounds.
Breathing control during intervals dictates how long you can sustain clean mechanics before fatigue compromises joint safety. Holding your breath under physical exertion causes rapid heart rate spikes and premature muscular failure. Inhale deeply during distance management phases and exhale sharply on impact. Conclude your bag session with five minutes of slow walking, shoulder rolls, and hamstring stretches to facilitate metabolic clearance and bring your nervous system back down.
Why Bag Work Impacts Stubborn Upper Abdominal Fat
Many people turn to heavy bag training in hopes of eliminating localized deposits of upper stomach fat or tightening the upper abdomen. It is critical to recognize the physiological reality that targeted spot reduction is biologically impossible. Performing crunches or throwing thousands of punches will not selectively draw fatty acids exclusively from the upper tummy; the human body mobilizes fat stores systemically based on overall energy balance, hormonal profiles, and genetic tendencies.
Despite the myth of spot reduction, heavy bag workouts represent one of the most metabolically demanding forms of exercise available for full-body fat reduction. A single high-intensity striking session burns significant calories while engaging large muscle groups across the legs, back, and shoulders. This massive caloric expenditure helps create the sustained energy deficit required to gradually decrease overall body fat percentages, which inevitably reveals definition throughout the entire abdominal wall.
The kinetic demands of throwing punches and kicks place continuous rotational tension on the rectus abdominis, obliques, and transverse abdominis. Every hook, cross, and roundhouse requires forceful core stabilization to transfer torque from the hips into the upper limbs. This dynamic tension strengthens and thickens the upper abdominal fibers beneath the subcutaneous fat layer, improving posture and creating a firmer midsection once systemic fat levels decrease.
Pairing high-intensity bag sessions with sensible nutritional habits ensures your training converts into visible physical changes over time. Consistency over several months yields far better body composition results than sporadic, exhausting sessions that lead to burnout or injury. Those wanting dedicated coaching for athletic conditioning often enroll in martial arts academies offering specialized fat loss programs that integrate bag work with comprehensive nutritional accountability.
Cleaning and Maintaining Gloves and Synthetic Grip Gear
Sweat, dead skin cells, and ambient humidity combine inside striking gloves and workout gear to create ideal breeding grounds for bacteria and persistent odors. Leaving damp gloves inside a closed gym bag leads to bacterial degradation of the inner foam padding and leather seams within days. Establishing a disciplined cleaning protocol after every home workout preserves equipment hygiene, prevents fungal skin infections, and dramatically extends the lifespan of your gear.
Many cross-training enthusiasts incorporate sticky receiver gloves or hybrid football gloves during circuit workouts involving heavy bags, kettlebells, and turf sprints. To clean football gloves and synthetic grip equipment without destroying their sticky silicone palms, hand wash them in a sink filled with lukewarm water and a small splash of mild liquid detergent. Avoid harsh bleaching agents, fabric softeners, or abrasive scrub brushes, which strip away the specialized adhesive coating.
Gently massage the soapy water through the glove fabric and palms, working out trapped sweat and chalk residue. Rinse thoroughly under cool running water until all soap traces are completely eliminated. To dry them, squeeze out excess water with a clean towel without wringing or twisting the seams, then hang them in a well-ventilated area away from direct sunlight or artificial heat sources. Never put synthetic grip gloves into an electric dryer, as high heat permanently ruins the grip film.
Boxing gloves require their own specialized care routine following intense heavy bag rounds. Wipe the exterior synthetic or leather shell with a lightly damp microfiber cloth treated with diluted disinfectant. For the interior, avoid drenching the lining in liquid sprays; instead, insert specialized cedar-filled glove dogs or silica moisture absorbers that draw out perspiration while neutralizing odor, leaving the gloves in an open, airy room between workouts.
Managing Ear Pressure and Fluid Build-Up After Training
Experiencing a sensation of fluid, fullness, or muffled hearing in the ears after an intense training session is a surprisingly frequent complaint among combat sports practitioners. This sensation typically stems from rapid pressure fluctuations inside the middle ear caused by heavy breathing, Valsalva maneuvers during forceful strikes, or sweat pooling in the external auditory canal. Sinus congestion from ambient dust or seasonal allergies can also block the Eustachian tubes, preventing normal air drainage.
If you suspect moisture from excessive sweating or post-workout showers is trapped inside the outer ear canal, rely on gentle gravity drainage rather than invasive tools. Tilt your head sideways toward the affected shoulder and gently tug the earlobe downward and backward to straighten the canal, allowing trapped drops to roll out onto a clean towel. Never insert cotton swabs, car keys, or pointed objects into the ear canal, as this packs debris deeper and risks perforating the delicate tympanic membrane.
To alleviate internal pressure or Eustachian tube blockages caused by intense exertion, encourage passive ventilation across the nasal passages. Swallowing, yawning broadly, or chewing gum activates the small muscles that pull the Eustachian tubes open, equalizing middle-ear pressure naturally. Applying a warm, damp washcloth over the cheekbone and ear area for ten minutes can also relax the surrounding tissues and promote comfortable drainage through the throat.
Distinguishing between benign fluid fullness and traumatic ear injury is critical for anyone practicing combat sports. Direct blunt impact or repetitive friction against the outer ear can cause a hematoma, commonly known as cauliflower ear, where blood pools between the cartilage and skin. If your ear appears swollen, hot to the touch, or painfully inflamed, seek medical evaluation promptly rather than attempting home remedies, as untreated hematomas lead to permanent cosmetic deformity.
Transitioning from Solo Bag Work to Supervised Coaching
While a home heavy bag is an outstanding tool for cardiovascular fitness and conditioning, it operates without feedback. A bag cannot counter your dropped hands, exploit your predictable rhythms, or correct a subtle flaw in your knee alignment during a roundhouse kick. Practicing exclusively in isolation often hardens technical errors into subconscious habits that become difficult and time-consuming to correct later on.
In-person instruction introduces dynamic unpredictability through focus mitt drills, partner timing exercises, and supervised sparring. Working with an experienced coach allows you to receive instantaneous corrections regarding stance width, head movement, and balance restoration after missed strikes. Furthermore, hitting Thai pads or mitts held by a trained coach simulates real target movement far better than a stationary heavy bag ever could.
When you decide to broaden your striking experience beyond the garage or basement, exploring accredited local MMA gyms offers an ideal environment to test your striking alongside wrestling and grappling transitions. If practical personal protection represents your primary training goal, look into dedicated self-defense classes that teach situational awareness, conflict de-escalation, and striking under adrenal stress.
The most effective training model balances autonomous home bag practice with consistent gym attendance. Use your home heavy bag to build muscular endurance, repeat technical combinations assigned by your coach, and maintain cardiovascular conditioning throughout the workweek. That way, when you step onto the gym mats, your body is conditioned to handle the demands of interactive drills, allowing you to maximize every hour of hands-on coaching.
Published 2026-09-20 · reviewed with each rebuild, last September 2026.
Find martial arts schools near you
The directory lists 32,877 martial arts schools by state and city — pick your state or use the “Near me” button in the header.
More guides
-
 Safety
Brazilian Jiu-Jitsu for Beginners: Tips, Fundamentals, and Mat Health
-
 Buying
Finding the Right Fit: A Guide to Sizing Your Jiu-Jitsu Uniform and Cross-Training Gear
-
 Money
MoneyHow Much Do Martial Arts Classes Cost? Membership Fees Breakdown
-
 Owning
What Is Mixed Martial Arts? Beginner Overview and Training Guide
-
 Owning
The History, Origins, and Physical Demands of Brazilian Jiu-Jitsu
-
 Owning
Traditional Martial Arts Guide: Understanding Wushu, Silat, and Naginata
-
 Owning
Understanding Mixed Martial Arts for Beginners
-
 Safety
How to Wrap Your Hands for Boxing: Step-by-Step Wrist and Knuckle Protection Guide
-
 Buying
Best Jiu-Jitsu Gis and Apparel: Complete Buyer's Guide and Sizing Chart
-
 Buying
BJJ vs Judo vs Wrestling vs No-Gi: Which Grappling Art Is Right for You?
-
 Buying
How to Choose the Best Jiu-Jitsu and MMA Gym Near You
-
 Owning
Brazilian Jiu-Jitsu for Beginners: Rules, Belt Ranks, and Mat Training
-
 Buying
Kickboxing Classes & Cardio Fitness Workouts Guide
-
 Owning
Martial Arts Belt Ranking Systems: Progression, Orders, and Displays
-
 Buying
Jeet Kune Do: History, Philosophy, and Modern Training Guide
-
 Buying
BJJ Gis and Uniforms Buyer's Guide: Brands, Fit, and Care
-
 Buying
Gracie Jiu-Jitsu Lineages, Academy Networks, and Training Philosophies
-
 Buying
10th Planet Jiu-Jitsu: Complete Guide to the No-Gi System and Academies
-
 Safety
Tai Chi Classes for Seniors: Health Benefits, Styles, and Practice Guide
-
 Owning
Heavy Bag and Boxing Workouts: Home Setup, Gear Selection, and Training Guide
-
 Buying
Adult Karate and Taekwondo Classes: Getting Started and Gi Sizing
-
 Owning
IBJJF Tournaments and Competition Guide: Databases, Rules, and Events
-
 Safety
Custom vs. Boil-and-Bite Mouthguards: Complete Selection and Fitting Guide
-
 Safety
Women's and Adult Self-Defense Training Guide: Techniques, Classes, and Systems
-
 Owning
Traditional Chinese Martial Arts: Shaolin, Wing Chun, Jeet Kune Do, and Gear Guide
-
 Buying
Adult Martial Arts Guide: Choosing the Right Style, Gym, and Training Class
-
 Buying
Filipino Martial Arts, Kenpo, Aikido, and HEMA: Comparing Traditional Combat Styles
-
 Owning
Heavy Bag Workout Guide: Routines, Drills, and Training for Cardio and Weight Loss
-
 Buying
Muay Thai and Cardio Kickboxing Classes: Training, Techniques, and Fitness Programs
-
 Buying
BJJ Gis, Rash Guards, and Apparel: How to Choose, Size, and Care for Jiu-Jitsu Gear
-
 Safety
Women's and Adult Self-Defense Classes: Selecting Programs for Real-World Safety
-
 Owning
Martial Arts Belts and Ranks: Belt Order, Taping, and Display Racks Guide
-
 Safety
Martial Arts Conditioning, High-Kick Mobility, and Protective Gear Guide
-
 Buying
Kids and Toddler Martial Arts: Complete Guide to Classes, Camps, and Family Dojos
-
 Owning
How to Hang a Heavy Bag: Ceiling and Wall Mounting Installation Guide
-
 Buying
Brazilian Jiu-Jitsu Schools, Academies, and Lineages: A Complete Guide
-
 Buying
Martial Arts Gyms, Fitness Studios, and Dojos Directory Guide
-
 Buying
Traditional Martial Arts Styles and Specialized Disciplines Guide
-
 Owning
BJJ and Martial Arts Gi Selection, Sizing, and Equipment Care Guide